Thursday, April 26, 2012

Birth Announcement Prints

I'll take a little break from the superhero posts and share with you the birth announcement prints, I made for Parker and Ryder.  It's still a kid related post, but so is my life.  I got my inspiration for this project from Pinterest.  I created it in Photoshop, using the boys names, birth dates, weights, heights, time of births and birth places.  I bought a 2 pack of white, 11x14 frames and mats from Michaels and I had 8x10 prints, printed at Costco.

2 Pack of Frames - $4.19 (with 40% off coupon)
2 White Mats - $5.98
2 Prints - $2.98

Total - $13.15

Now, I need to find a place to hang them.  I have a bunch of other prints in white frames, that I would like to hang together.  All I need now is an empty wall.

A little way to remember those very special moments. 


Happy Champagne Thursday!

Cheers!

Thursday, April 19, 2012

Superhero Canvases

Parker has some new artwork in his room.  I made him a Superman, Batman & Spider-Man canvases for his room, using a few different techniques.  He is loving all of his superhero stuff!

I used a two, 16x20 canvases and one 8x10 for these projects.  I bought a two pack of 16x20 canvases at Michaels for $6, with a 40% off coupon.  The 8x10 canvas I already had.


Paints and Brushes

Technique #1 - Freehand (with a little help from a ruler)

For the Superman picture, I used a 16x20 canvas.  I drew the logo on the canvas, using a smaller logo as an example.  The particular logo I was using, was half its size, so I doubled all the lengths on the exterior of the logo and freehanded the "S".  Then it was a basically a paint by number.  It was kind of tedious and everything needed a few coats, so it took me a little while to finish it.  I used the paints in the picture above and a variety of different sized brushes.  The yellow in the finished picture below is brighter than the picture shows.
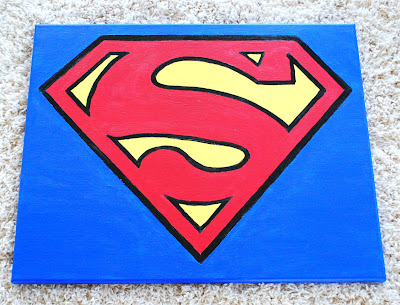


Superman

Technique #2 - Block Poster Transfer

For the Batman picture, I also used a 16x20 canvas.  I was having a hard time figuring out how I was going to get the Batman logo on the canvas, until I found Block Posters.  Block Posters lets you create any size poster with any image and its free!  All you do, is upload your picture, select the size you want, download and print.  After I printed the logo, I cut it out and kept only the black of the logo, then taped it together, taped it to my canvas, traced the logo with yellow chalk and painted.  Painting over chalk is much easier and covers much better, than painting over pencil.  And again the yellow in the finished picture below is actually much brighter.

Just in case anyone is curious, Batman is my favorite superhero.


Batman

Technique #3 - Mod Podge

Spider-Man is one of Parker's favorites, so I knew I had to do a Spider-Man picture.  It took me a while to decide what I wanted to do for Spider-Man, to me its the most complicated superhero logo.  Luckily, I found a couple Spider-Man posters at Michaels for a dollar and decided I would color one and use Mod Podge to attach it to the canvas.  I used a smaller 8x10 canvas for this one, painted it blue, then I colored in Spider-Man with marker, cut him out with the skyline, then followed the directions on the Mod Podge bottle and attached Spider-Man to the canvas.  The Mod Podge faded the colors of Spider-Man, so I colored him again with marker to brighten it up.


Spider-Man


These are hanging in Parker's room right now, but I'm not sure they are in their final spot, so no picture yet.  He was anxious to get them hung up in his room!  Coming soon...more superhero projects!  

Check out the other superhero projects I've done for Parker's room:

Happy Champagne Thursday!

Cheers!


Thursday, April 12, 2012

Super Parker Table

I've been busy working on superhero projects for Parker's room.  I made him a Superman themed, "Super Parker", table for his room.  My sister moved away (sad face) about a month ago and left me with a couple side tables.  She got them for free when she bought a couch a while ago.  I thought one of them would be a perfect night stand for Parker's room.

I used the table that already had a coat of primer on it, to save me a little time.  I drew the logo on top, with pencil, I used a ruler for the outside of the logo, then free-handed the rest.  If I were to do it again, I wouldn't use a pencil.  It takes quite a few coats of paint to cover up pencil.  I painted the legs with my free sample of Valspar's Porcelain Red.  It took about five coats.  I used some other miscellaneous paints (picture below) I already had, for the blue, yellow and black.  Outlining the logo in black was an after thought, it makes the logo pop.  I think it was a good decision.  To complete the project, I sprayed it with some Krylon Clear Protective Spray, in a satin finish.

This project set me back zero dollars.  I love free projects!  Parker is loving his new superhero table!  He thinks its pretty cool.


Check out the superhero pillows I made for Parker's room here.

More Superhero projects coming soon.  Stay tuned.

Happy Champagne Thursday!

Cheers!


Wednesday, April 11, 2012

5 Months

And another month just flew by, in a blink of an eye!  Ryder is 5 months old!

Firsts:
Rice Cereal & Carrots - He doesn't really seem to be a fan of baby food yet.  He'll eat a few bites and then be done.  Not at all like his brother.  Parker was a really good eater, right from the start.  Ryder is happy with his milk for now.
Rolling over from back to tummy - Every time I lay him down, he rolls over almost immediately.  He likes being on his belly and I think he'll crawling before too long.  Again, nothing like his brother.  Parker didn't like being on his tummy at all and he was six months when he rolled from his back to his tummy.
Swinging at the park - We've been enjoying some nice days at the park.  We are ready for Summer!
St. Patrick's Day - Celebrated with mom and dad at Sean Kelly's.  Parks was in Helena with Grandma and Grandpa.
Easter - The Easter Bunny hopped by our house and left lots of goodies for the boys.  We enjoyed a nice day at home and dinner with great friends!
Concert - We've enjoyed a couple of Family Friendly Fridays at the Top Hat.  It's fun for the whole family and it let's Chris and I feel like we have a little bit of a social life.

Favorites:
My brother - He loves to watch Parker, no matter what he's doing.  If Parker lays down next to him, Ryder will roll over to get to him.  They are pretty cute together!
Jumping in my Jumperoo - He loves to jump, just like his brother did when he was a baby.
Spitting - I wonder how long I will think this is cute for.
Finding my toes - He keeps trying to pull off his socks.
Pulling mom's hair - He loves to give me hugs and wrap his hands around my neck, grab my hair or pinch my neck.  Ouch!


Enjoy the pictures from Ryder's 5 month photo shoot 


Such a serious face.  I love his feet!

Getting his toes


My favorite!


Cute Brothers

Learning to defend himself from an early age


And I'm done...

See how Ryder has grown in the past 5 months:

Cheers!

Thursday, April 5, 2012

DIY Foam Soap

We go through a lot of soap in our house, especially with a three year old constantly washing his hands.  So, I decided I would try and make my own foam soap and save a little money.  By the way, I have found that foam soap works best for little kiddos washing their hands.  Foam soap is pre-lathered, covering the hands more quickly and it is easier to wash off than other soaps.  Most people (not three-year-olds) use less water when using foam soap, another added bonus.

Directions for Making your own Foam Soap:

What you will need:
Empty Soap Dispenser
Shower Gel
Hot water

1.  Clean empty soap dispenser
2.  Add about 3/4" - 1" of shower gel
3.  Add hot water
4.  Very slowly tip soap dispenser upside down and repeat until shower gel is mixed with the water completely.  Do not shake.
5.  Pump until foam is dispensed
6   Wash hands and enjoy saving a little money


Shower Gel & Empty Soap Dispenser

Add Shower Gel


DIY Foam Soap

Nice and foamy

I had to bribe this little boy with one of these cookies, in order for me to take pictures of him.  At least his hands were clean :)

Scrub, scrub, scrub


All Clean


The soap I made, seems to have the same amount of foaminess as store bought foam soap and works great.  I plan on continuing to make my own foam soap, at least for the soap that Parker uses all the time.

Happy Champagne Thursday!

Cheers!